Hometap Tip: Flush and Close Outdoor Faucets

Header Image

A few years ago, an unnamed, first-time homeowner member of the Hometap team didn’t realize this important task needed to be done and, come winter, had a burst pipe in the basement when the pipe’s residual water froze and expanded. Hours of cleaning and a hefty plumbing repair bill later, they’ve never made that mistake again! With burst pipe repair costs ranging from $500 to $3,800, taking an hour or so to drain your exterior pipes this weekend will grant you peace of mind and save you money once freezing conditions settle in.

What You’ll Need

The Basics

  •  Gloves
  •  Bucket

What to Do

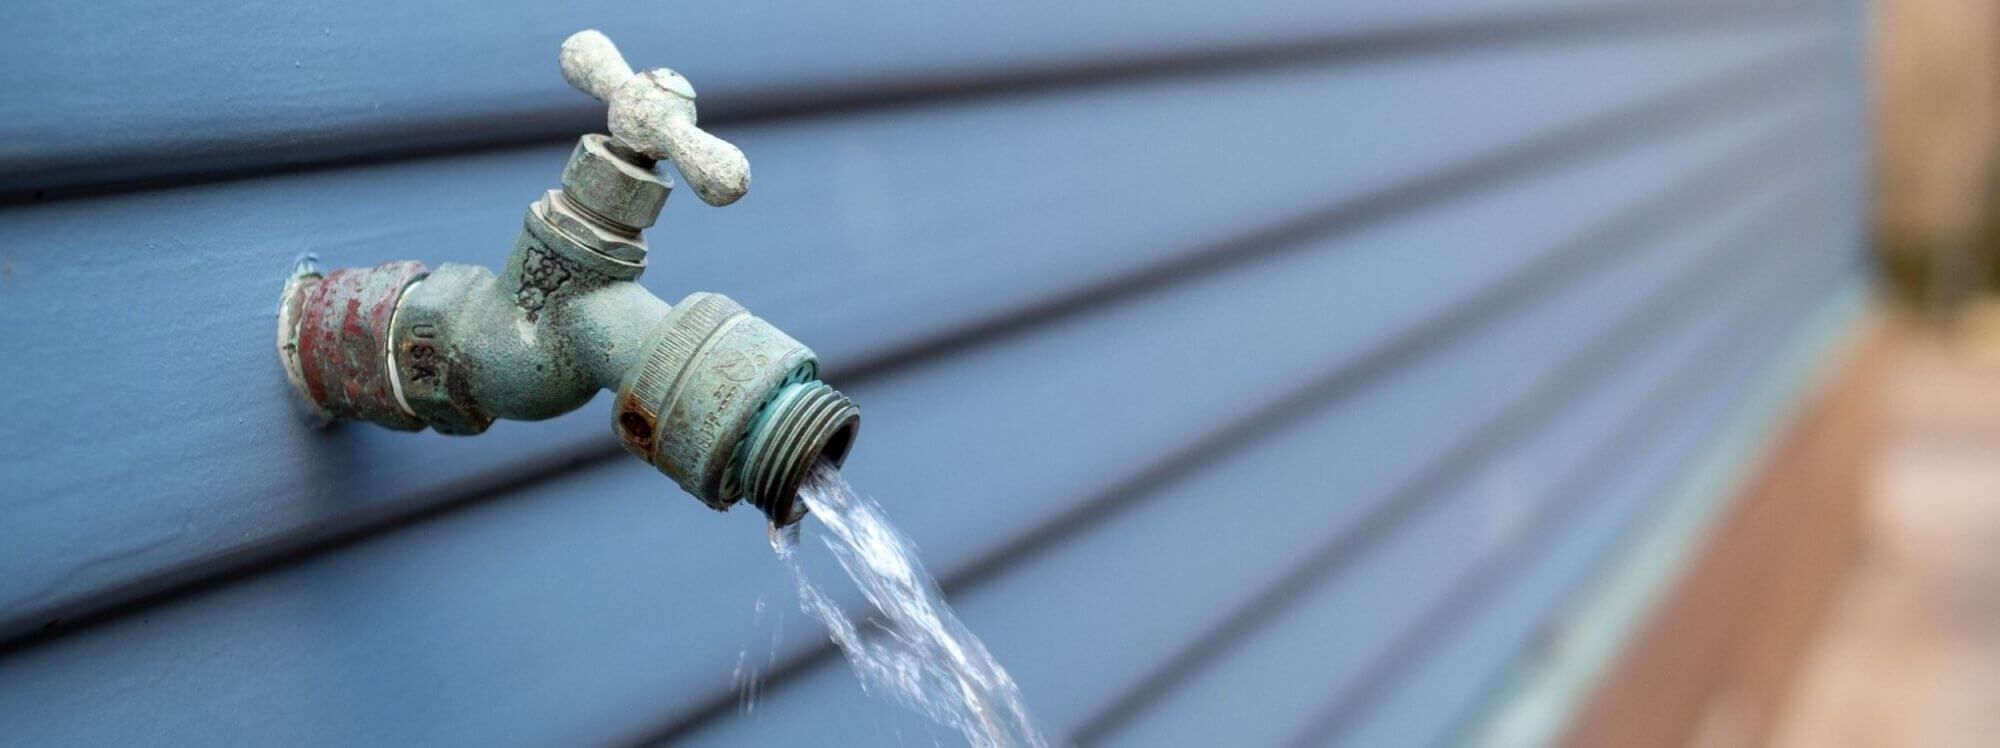
Turn off the water supply and drain all residual water in pipes connected to outdoor faucets.

How to Do It

Identify each faucet around the exterior of your property and remove attached garden hoses (as applicable). Drain remaining water from hoses, then roll them and store away for the winter. Choose a faucet to address first (if you have more than one) and make sure it’s in the off position.

Locate the water supply valves to each exterior faucet and shut them off. (They’re typically found on or near the basement ceiling or next to the main water supply valve.) Once the water supply has been shut off, go back outside to the exterior faucets. Place a bucket under each and turn the faucets on to drain any residual water. Once excess water has been drained and collected, dump the bucket. Leave the faucet in the on position.

Go back inside with your bucket to the interior pipe’s water supply valve and locate the bleeder cap. Holding the bucket underneath the valve, unscrew the bleeder cap to drain the remaining water out of the pipe. Once all water has been drained, replace the bleeder cap and fasten tightly. Go back outside to drain the bucket and turn the faucet off.

Repeat this process with each exterior faucet around your property.

LEGAL DISCLAIMER

The opinions expressed in this post are for informational purposes only. To determine the best financing for your personal circumstances and goals, consult with a licensed advisor.

Hometap Tip: Seal Your Windows before Winter

Header Image

Last updated November 22, 2021 

Heating bills can be expensive, so the more you can do to keep your heat inside (and not escaping through drafty windows), the more budget-friendly (and energy-efficient) your home will be. Many DIY solutions cost $10 or less at your local hardware store, so spending a little pocket money and taking a few hours to plug up those drafts could save you hundreds once winter storms start raging.

What You’ll Need

The Basics

  • Scrub brush
  • Cleaning solution (e.g., dishwashing soap)
  • Weatherstripping product of your choice
  • Draft snake
  • Curtains

The Works

  • Caulk
  • Rope caulk
  • Plastic shrink film
  • Adhesive (e.g., double-sided tape)
  • Hair dryer
  • Insulated curtains

Want more tips like this to preserve your home’s value? Get our free Equity Increaser Guide! 

front cover of guide book


How to Do It

Locate which windows are drafty, examine their problem spots (e.g., cracks, gaps, etc.), then decide which type of seal and/or insulation (caulk, weatherstripping, plastic shrink film, draft snake, etc.) would work best.

Winterizing Windows: Outside

Caulk

Scrape off any old caulk or peeling paint from the window frame, then clean off the frame with soapy water and a scrub brush. Wipe dry. Using exterior-grade caulk, apply a new, continuous line of caulk between the window frame and your home’s siding, ensuring there are no gaps.

Rope Caulk

Pull off the amount you need, then mold the rope to fit into the drafty area or window frame gaps. Press to seal.

Winterizing Windows: Inside

Draft Snakes

Purchase draft snakes (e.g., fabric tubes filled with cedar chips or similar material that block drafts) or make your own. Place on drafty window sills.

Foam Weatherstripping

Clean your window sashes to remove all dirt and grime. For double-hung windows, cut adhesive-backed foam weatherstripping to fit the size of your sashes, then apply to the bottom edge of the lower sash and the top edge of the upper sash. Alternatively, you can place weatherstripping on the sill directly below the lower sash and the head jamb over the upper sash. Close the window to seal and lock it. On casement or sliding windows, place the weatherstripping vertically along the side jamb or on the sash’s vertical edge.

Insulated Curtains

Measure your window sizes and purchase appropriately sized draft-blocking curtains. You can select regular curtains with heavy fabrics, layer up multiple thinner curtains, or go for specially designed insulating curtains constructed from thermal materials. Hang with a rod that supports the extra weight.

Plastic Shrink Film

Place over window and seal with double-sided tape. Heat with a hair dryer until sheeting has shrunk to fit and is taut over the window frame, sealing out any cold air.

Rubber Weatherstripping

Cut to fit your particular window, then peel off adhesive strip and cover the frame to seal any drafts.

Have bigger renovations in mind? Take our 5-minute quiz to see if a home equity investment is a good fit for you and your home goals.

YOU SHOULD KNOW…

We do our best to make sure that the information in this post is as accurate as possible as of the date it is published, but things change quickly sometimes. Hometap does not endorse or monitor any linked websites. Individual situations differ, so consult your own finance, tax or legal professional to determine what makes sense for you.

Hometap Tip: Prep Your Garden and Landscaping for Winter

Header Image

Protecting your garden against winter weather preserves your landscaping and gardens while maintaining your property’s curb appeal. Most basic preventive tasks can be covered by on-hand household items, but even if you do have to take a trip to the store, your costs will be minimal. For example, tree wrap costs less than $10 for a 50-foot roll; wire netting can run between $10 and $100, depending on how much you need. With a little prep work this autumn, you can keep your garden gorgeous!

What to Do

Protect your lawn, garden, and landscaping in advance of cold temperatures and wet weather.

What You’ll Need

The Basics

  •  Gardening gloves
  •  Rake
  •  Shovel or trowel
  •  Lawn mower
  •  Garden hose
  •  Burlap
  •  Lawn disposal bags or compost unit
  •  Grass seed
  •  Fertilizer
  •  Mulch

The Works

  •  Lawn aerator or aerator shoes
  •  Tree wrap
  •  Wire netting

How to Do It

If you live in a region where winters are harsh, you’ll want to take steps this fall to prep and safeguard your outdoor plants, lawn, trees, and shrubbery against freezing temperatures and inclement weather.

First, clean up the yard, including raking all leaves, mowing the grass, weeding, removing dead annuals, and disposing of any fallen fruit. If you have perennial plants, cut back those that need freshening up (flowers like peony and phlox) but leave hardier ones (like ornamental grasses and mums).

Aerate your lawn and reseed and/or fertilize problem spots as needed.

When temperatures start dropping, wrap any thin-bark tree trunks (which include redbuds, maples, and nearly all fruit trees) with tree wrap to protect the bark and insulate the trees. If you know certain shrubs or plants attract pests, surround them with wire-mesh screens or burlap to discourage nests during cold months.

After the first frost, dig up your perennial bulbs (e.g., dahlia, gladiolus) and dry the roots for a few days. Store for the winter in peat moss or sawdust in a cool, dry place. Once your bulbs are removed, add a layer of mulch around your flower beds to protect the remaining plants.

If you have a dry fall, be sure to water your gardens and lawn generously to provide adequate hydration before winter settles in.

LEGAL DISCLAIMER

The opinions expressed in this post are for informational purposes only. To determine the best financing for your personal circumstances and goals, consult with a licensed advisor.

Hometap Tip: Test Your Sump Pump

Header Image

A working sump pump prevents water damage, mold, and mildew in your home’s basement and foundation. Roto Rooter experts recommend testing your sump pump at least once a year and replacing it every 10 years. Replacing your sump pump can cost up to $475, which may seem steep at first but it’s much less than the potential costs of cleaning a flooded basement and removing mold from your home ($2,000 to a whopping $30,000 for cleanup alone, not to mention possible health-related costs). Test your sump pump this weekend and preserve your home’s structural stability, maintain your family’s health, and save thousands in costly repairs.

What to Do

Check your basement sump pump for clogs or malfunctioning parts.

What You’ll Need

The Basics

  •  Five-gallon bucket
  •  Gloves

front cover of guide book

How to Do It

First, locate your home’s exterior pipe that drains water away from the sump pump. Inspect it for any obstructions and clear away all blockages.

Then, go to your sump pump and identify its two power cords: the pump cord and the float cord plug. (They should be attached to each other.) Unplug both from the electrical outlet, then unplug them from each other. Plug only the pump cord back into the power source. If the sump pump is working properly, you’ll hear the pump start to run. Unplug the pump, reattach the two cords, then plug back in.

Fill a five-gallon bucket with clean water. Take the lid off the sump reservoir and slowly pour in some water from the bucket, keeping an eye on the sump pump switch. You should see the switch turn on and begin to pump water. Once the water has drained, observe to see if the pump turns itself off. Once it has, add the rest of the water from the bucket to see if the pump turns on again and repeats the process.

If either the electrical or bucket test show any sign of damage, inefficiencies, or simply aren’t working, call in a plumber to get your sump pump fixed and/or replaced.

LEGAL DISCLAIMER

The opinions expressed in this post are for informational purposes only. To determine the best financing for your personal circumstances and goals, consult with a licensed advisor.

Hometap Tip: Check Your Deck

Header Image

Take a weekend annually to focus on deck problems when they’re small (like checking and maintaining your deck’s lumber and fastenings) and you’ll preserve the integrity and longevity of your entire deck—and save up to $2,500 in new treated lumber boards. It’ll cost you much less time and money to address minor repairs now, so you don’t have to do a full replacement later.

What to Do

Check your deck to see if any repairs are needed.

What You Need

The Basics

  •  Flathead screwdriver to test cracks and screws
  •  Caulk to seal minor cracks
  •  Wood glue or heavy adhesive to secure loose boards or balusters
  •  Replacement bolts and screws
  •  Gloves
  •  Trash bags

The Works

  •  Varnish
  •  Paint

front cover of guide book

How to Do It

Take a walk on and around your deck, looking for both structural and minor problems that need attention. You’ll want to look for damaged wood (e.g., cracks, decay, holes, or rot), as well as loose hardware and/or signs of pests.

You’ll also want to check the ledger (e.g., the material that attaches the deck to your house) and your deck’s connecting/support beams for any signs of rust or wear. Ensure that there are no gaps between the ledger and the house itself, and confirm all screws are solid and tightly attached. See if any support beams need new reinforcements. Confirm all rails, balusters, and steps are sturdy and secure.

Finally, consider aesthetics: Clear accumulated leaves, branches, and dirt on and around the deck, and decide whether to add new finish or a fresh coat of paint.

Once you know the scope of your deck repairs, you can determine whether to go DIY or call in a professional.

Take our 5-minute quiz to see if a home equity investment is a good fit for you.

LEGAL DISCLAIMER

The opinions expressed in this post are for informational purposes only. To determine the best financing for your personal circumstances and goals, consult with a licensed advisor.

Keeping Bugs Out of Your House and Garden

Header Image

The struggle is real: Keeping bugs and pests out of your home and garden is an ongoing battle, no matter the climate or region you call home. From bed bugs to termites, squirrels to raccoons, pests can threaten the structural integrity of your home and pose health hazards to you and your family, among other headaches.

And the havoc they wreak is expensive: The average costs to repair termite damage is around $3,000; removing raccoons from your attic could run you up to $500. Proactive homeowners know making their home inhospitable to pests can pay dividends by avoiding costly critter-caused repairs (and, let’s face it, the gross-out factor).

We’ve checked in with the experts to share their best tips for keeping bugs and vermin out of your house and garden.

Keeping Pests Out of Your House

  •  The American Grandparents Association has eight no-nonsense tips to bug-proof your house. (Our favorite: “Don’t make your house a bug buffet” by sealing snacks, fruit, and other food sources.)
  •  Blogger/influencer Mommy Mandy recommends five ways to pest-proof your house, from sealing points of entry to maintaining a clean kitchen.
  •  The Attic Pest Authority advocates “inspecting everything that you bring in to your house” while also keeping your home clean and clutter-free. The fewer places for grubs and bugs to hide away, the better!

Stop Bugs from Eating Your Plants

  •  The experts at the Farmers’ Almanac offer tried-and-true tips for keeping pests out of your garden without resorting to pesticides. Their wide-ranging tactics address larger pests (like deer and groundhogs) to tiny invaders (like slugs and snails).
  •  Country Living put together 10 ways to protect your garden from critters, including containing your compost, using raised beds, and choosing “less tasty plants.”
  •  Making organic pesticides can be as simple as browsing your pantry, say the folks at Natural Living Ideas. Check out their recipes for garlic spray, citrus insecticide, and hot pepper spray, among other concoctions.

Hometap's equity increaser guide.

Watch the Pros at Work…

  •  Eliminate the habitat and eliminate the bugs, says Danny Lipford of Today’s Homeowner. His video highlights a few trouble spots around your home’s perimeter that homeowners can identify and fix quickly to keep bugs out.
  •  From reusable netting to fencing, pest prevention for your garden gets a video tutorial from Tractor Supply Company.
  •  Don’t kill indoor spiders! Sweep them up and bring them outside, where they can eat other bugs, says University of Maryland Entomology professor Michael Raupp. Check out his visit to the “Today” show covering how to keep ants and other pests from moving in.

Little deterrents can go a long way: As we settle into summer and fall, take time to ensure your house and garden are off-limits to pests and vermin.

LEGAL DISCLAIMER

The opinions expressed in this post are for informational purposes only. To determine the best financing for your personal circumstances and goals, consult with a licensed advisor.

Outdoor Pruning: Your Weekly Tip from Hometap

Header Image


By keeping your yard tidy, pruning maintains your home’s curb appeal. It stops plant growth near your foundation and roof, warding off pricey repairs (up to $4,000) down the line. Pruning also discourages vermin from building nests in your shrubbery. Prune regularly in summer and fall to keep your yard and home spic, span, and safe.

What to Do

Wondering how to trim those overgrown hedges? We’ll show you how to prune all hedges and shrubs in and around your yard to maintain curb appeal and avoid repairs.

What You’ll Need

The Basics

  •  Pruning shears
  •  Loppers
  •  Eye protection
  •  Work gloves
  •  Heavy-duty trash bags

For Big Jobs

  •  Pruning saws
  •  Hedge shears
  •  Pole pruners

How to Do It

Cut back areas where your hedges are overgrown, unshapely, or extending onto your neighbor’s property. Clear areas where greenery is encroaching on your home’s foundation and/or roof as well as near sidewalks or your driveway. You can plan on pruning yourself or hiring a landscaper. If you go the DIY route, work in the morning or evening to avoid summer sun and midday heat.

If you prefer to watch a short how-to video to get you started, check out this great tutorial from Angie’s List

LEGAL DISCLAIMER

The opinions expressed in this post are for informational purposes only. To determine the best financing for your personal circumstances and goals, consult with a licensed advisor.

Hometap Tip: Stow Away Your Outdoor Furniture

Header Image

Cleaning and safe storage preserve the life of your outdoor furniture so you can enjoy your patio or deck for many summers to come. Spending $10 to $20 on cleaning supplies ensures grime and pests won’t deteriorate your outdoor furniture while $100 or less can provide adequate covers to protect your furniture from precipitation and freezing temperatures. Unless you like to update the look and feel of your outdoor space regularly (which can cost thousands of dollars), this small prevention investment can keep your outdoor furniture in great shape, year in and year out.

What to Do

Clean your outdoor furniture and stow it away for winter months.

What You’ll Need

The Basics

  •  Garden hose
  •  Bucket
  •  Sponges or scrub brushes
  •  Cleaning supplies
  •  Gloves
  •  Dust mask
  •  Tarps or furniture covers

How to Do It

Remove and launder all fabrics from outdoor furnishings (e.g., seat cushions, canopy drapery, rope hammocks). Let dry thoroughly, then fold and store in a cool, dry place.

Using a material-appropriate cleaner (e.g., oil soap for wood, bleach and water for wicker, gentle detergent for plastic), wash and rinse all outdoor furniture, then allow to dry completely. If the material is subject to cold-weather damage (e.g., wood or metal), apply a coat of rot- or rust-resistant treatment (e.g., sealant, oil, or wax).

Clear a space in a dry shelter (e.g., a shed or garage) and place furniture into the designated storage area. Cover with tarps or custom-fit furniture covers. Ensure the area around the stored outdoor furniture is inhospitable to any potential pests (e.g., lay down any traps for rodents or bugs).

LEGAL DISCLAIMER

The opinions expressed in this post are for informational purposes only. To determine the best financing for your personal circumstances and goals, consult with a licensed advisor.

Hometap Tip: Insulate Your Older Hot Water Heater

Header Image

According to the Department of Energy, insulating your hot water heater can minimize heat losses up to 45%, which means a more efficient heater and a warmer home. With that efficiency comes savings—potentially up to 16% off your heating bills. The installation costs are minimal, too: While insulators for hot water heaters can cost around $20, your utility company may offer them for free at a discount. For toasty rooms and lower bills this winter, head down to your basement and insulate your hot water heater this weekend.

What to Do

Insulate your older hot water heater to maximize its efficiency.

What You’ll Need

The Basics

  •  Gloves
  •  Dust mask
  •  Measuring tape
  •  Marker
  •  Scissors
  •  Hot water heater insulated blanket or jacket kit
  •  Electrical tape

front cover of guide book

How to Do It

While many new hot water heaters come pre-insulated, older models may need additional insulation to increase their efficiency and properly heat your home. If you have a hot water heater that’s warm to the touch, it’s a good idea to insulate it. Purchase an insulating blanket or heater cover or check with your utility company to see if they offer free or discounted blankets/covers.

First, check your hot water heater for any leaks. (If it’s leaking, you need to replace it outright.)

If you’re in the clear, turn off the power to the hot water heater. Measure the height of the hot water heater and cut the insulated blanket or jacket to fit. Once the blanket is the right size, wrap it around the heater, keeping the top of the unit clear. (On gas heaters, the vent is located on top.) Use electrical tape and secure the blanket just enough so it stays in place.

With a marker, note where the water heater’s controls are. On electric heaters, they’re typically found in side panels. On gas heaters, they’re the gas valves, burner, pressure relief valves, and pipes. Take scissors and cut corresponding holes in the insulating blanket so the water heater’s controls are accessible. With gas burners, make each hole an extra inch wider than the control area (e.g., the holes shouldn’t be snug).

Readjust the insulating blanket so the holes line up with the controls, then securely tape it in place. Restore power to the hot water heater. If you have an electric hot water heater, check the thermostat so it’s not set higher than 130° F to prevent overheating.

LEGAL DISCLAIMER

The opinions expressed in this post are for informational purposes only. To determine the best financing for your personal circumstances and goals, consult with a licensed advisor.

Hometap Tip: Winterize Your Air Conditioning Units

Header Image

Making sure your air conditioning units are prepped for winter can prevent expensive replacement costs once spring and summer arrive. Replacing window units averages $275 per air conditioner while replacing your central air conditioning can range from $1,800 to $10,000. Considering tarps and cleaners can cost less than $20 combined, this preventive work is a great return on investment!

What to Do

Safeguard your air conditioning units during the winter months to boost their durability and operating life. ‍

What You’ll Need

The Basics

  •  Garden hose and spray nozzle
  •  Gentle cleaner (e.g., dishwashing soap or window cleaner)
  •  Soft towel or sponge
  •  Window-unit-sized covers (e.g., tarps, newspaper, burlap)
  •  Fasteners (e.g., bungee cords)

Downloadable equity increase guide

How to Do It

For Central A/C

Turn off the power to your central A/C unit. Clean coils with a bristle brush then use a garden hose to remove accumulated dirt and debris. Wipe down hard-to-reach spots with a gentle cleaner (e.g., dishwashing soap) and a towel.

Clean the central A/C filter, which is typically found at the unit’s return air duct (located inside your home, often in the basement). Open the front grill and remove the filter then tap gently to remove accumulated dust and dirt; you can also vacuum or brush them clean if necessary. Rinse them clean and let them dry completely, then return to the unit.

Back outside, cover all exterior pipes to the central A/C unit. Your unit itself should be designed to withstand winter conditions and resist pests and doesn’t need to be covered (as this can build up condensation and damage the system or create a safe haven for animals seeking shelter). If you’re concerned about heavy storms, secure a piece of plywood to the top of the unit to protect from falling branches and the like.

For Removable Window Units

Unplug the window air conditioning unit and remove panels that hold it in place. Then remove the air conditioning unit from its window and clean out any accumulated debris such as dirt or leaves. Check for and remove any bugs and mold. If the unit is particularly dirty, clean with a garden hose or a bucket of soap and water. Allow the air conditioner to dry completely, including draining any residual water from the cooling unit. Once dry, wrap or cover each air conditioner and store in a place that’s warm, dry, and elevated to prevent condensation buildup and rust. Repeat with each removable window air conditioning unit until all are cleaned and stored.

For Permanent Window Units

Unplug the in-window air conditioning unit then hose it off, remove any remaining debris, and let dry completely. Once dry, encase the air conditioning unit with burlap, a tarp, or a custom winter air conditioner cover. Secure cover with bungee cords as needed. Repeat with each in-window air conditioning unit around your home. Monitor all covers regularly during winter months to ensure there are no breaches (e.g., fabric tears) and replace as necessary.

LEGAL DISCLAIMER

The opinions expressed in this post are for informational purposes only. To determine the best financing for your personal circumstances and goals, consult with a licensed advisor.